Manga Image Editing
A simple to understand guide covering the most important page edits.

Simple Denoising
One can simple denoise pages using waifu2x, which in contradiction is not only used to upscale. For Windows you could use waifu2x-caffe which has an GUI.
Using the 2-D Illust (CUnet Model) on Level 2 Denoise Only and Use TTA Mode unchecked is generally "good enough" for denoising on low to mid machines.
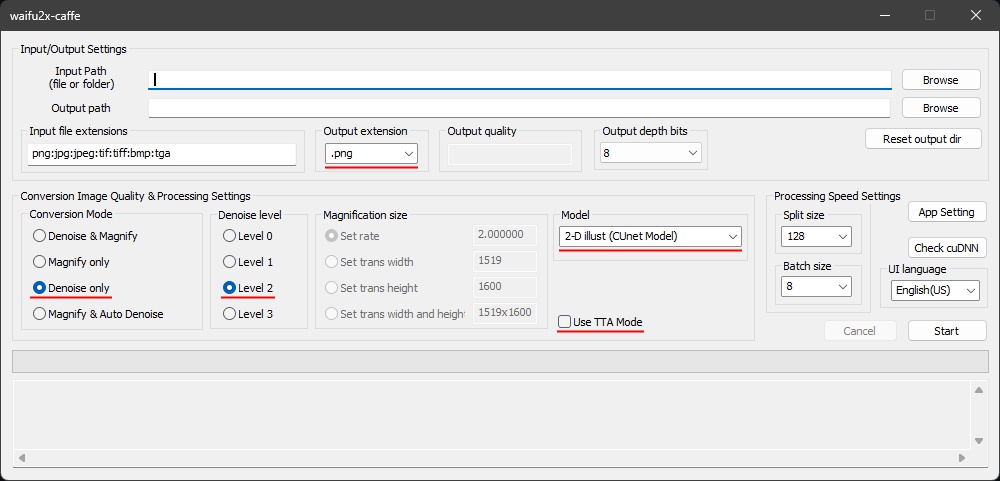
Under processing Speed Settings it is recommended to leave the Split Size on default, unless you are getting weird/incorrect outputs which you might need to adjust this then. You can increase the Batch Size if your GPU can handle more load to process the splits parallel to speed up the denoising.
The Use TTA Mode will process each split piece multiple times rotated around, this will generally improve the denoising but the total processing will take 8 times longer, so for simple fast good-enough denoising you can leave it unchecked, unless you have the time for it to do so.
On a final note, it is recommended to have the Output Extension set to PNG as this is a lossless fileformat, unlike Jpeg which would introduce artifacts again you just took the effort in to denoise.
Grayscaling, Leveling, and Optimizing
Tools
The following tools would be used for any kind of grayscaling, leveling, and lastly lossless optimizing;
- ImageMagick
- Pingo
- imgdanke
- optional for GUI but does not support Pingo v1+ at the moment.
Grayscaling
The majority of the panels are black and white and can safely be grayscaled if they are not already are (e.g. 24-bit jpegs or pngs for example) to reduce the filesize of those images.
The command (CLI) to use with ImageMagick to batch process all images inside the current folder (that your command prompt is in) would be;
magick mogrify -format png -dither None -colorspace Gray *.pngLeveling
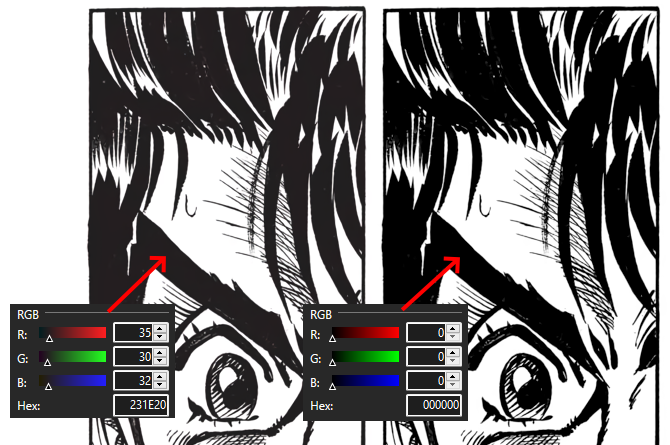
Leveling images would only be required when blacks ain't actual black, and after grayscaling it would look a bit washed. Before grayscaling it can even have a hue or colored tint.
Stretching
A simple method without too much effort would be using the -contrast-stretch option from ImageMagick which will try to stretch the (closest) blacks to #000 and (highest) whites to #fff however this does not properly work if there are pixels closer to black than the intended targeted blacks, as the stretch finds the lowest/highest colors.
The command (CLI) to use with ImageMagick to batch process all images inside a folder would be;
magick mogrify -format png -dither None -colorspace Gray -contrast-stretch 0%x0% *.pngManual Leveling
With manual leveling you would needed find the minimum black point to have your targeted blacks be actual black (#000) and raise the gamma to compensate for the raised blacks to have the image not be over leveled. This can be somewhat of a trial-and-error till you get a satisfying result. As a starting point you can use the following value for ImageMagick 13,100%,1.3 (used in the example image shown above), where 13 is the raised black point and 1.3 is the gamma adjustment value.
The command (CLI) to use with ImageMagick to batch process all images inside a folder would be;
magick mogrify -format png -dither None -colorspace Gray -level 13,100%,1.3 *.pngOptimizing
You can safely and lossless optimize images to reduce filesize even more, using the following command (CLI) with Pingo version 1+;
pingo -lossless -s4 path-to-folder